Issuing refunds is part of business. As a matter of fact, I have found issuing prompt refunds makes for happy non-customers! In my businesses, I attend to refund requests before support requests. Making it easier to ask for and provide a refund increases customer trust.
Some shopping carts / e-commerce software allow you to issue refunds. But for most, it’s a manual process. For every refund request, you have to log in to PayPal, find the transaction via Transaction History and issue a refund. We wanted to make this process faster and simpler. So we included a quick “Issue Refund” button on every refundable transaction in Putler – both on the Sales dashboard and on the Transactions dashboard.
Putler tracks refunds and links them up to items in the transaction. This way, you can find out refund ratio for each of your products. This is key to determine the quality of that product and your marketing material. And sure, it also acts as an indicator of your target market’s patience levels 🙂
It’s easy to track full refunds, we can simply mark all items in that transaction as refunded. But how do you link partial refunds to products? PayPal does not provide any mechanism for this. Neither any shopping cart / e-commerce system as far as we know.
So we built this feature within Putler.
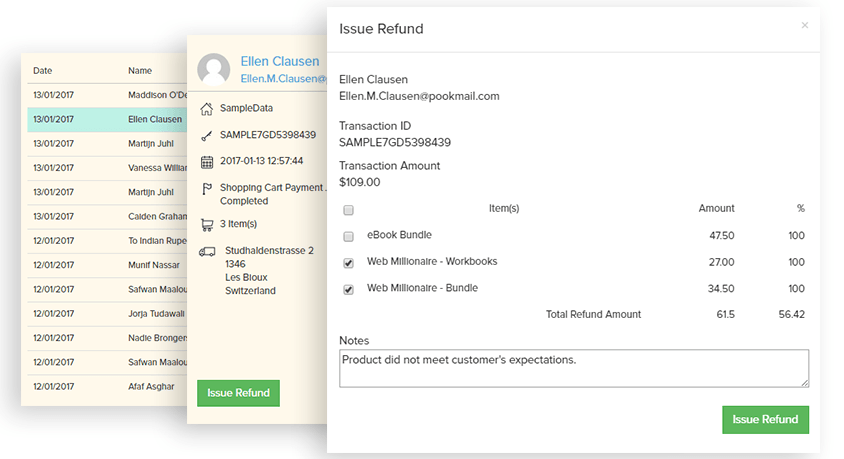
Putler now asks you to select items you want to refund. It selects everything by default, so you can quickly do a full refund. But if you want to do a partial refund, you can select items you want to refund, and even the amount (or percentage) of refund you want to provide for each item.
If you have already done a partial refund on a transaction, Putler will notify you of that as well.
Steps to issue refunds using Putler
- Come to the Sales or Transactions dashboard in Putler
- Search for the customer’s name / email address / transaction ID / product’s name – anything you can get from the customer’s refund request. You will see results in split second.
- Locate the transaction in the list and click to see it’s details (Putler will automatically select the first match. So if there is only one match, you don’t have to do this.)
- If you did not find the transaction, expand date range if necessary – this will automatically perform the original search once again with the new date range.
- Click on “Issue Refund” button.
- If you want to give full refund, you can go ahead and issue refund now.
- If you want to refund only some items from the sale, un-check the other items. Putler will automatically total up the refund amount.
- If you want to provide a percentage refund, click on the % value for each item and change it as you need.
- If you want to provide partial refund for an item, click on the amount value and change it as you need.
- Add Notes if you wish.
- Click “Issue Refund” to process the transaction.
- Putler will provide refund in the background, give you a confirmation, update the original transaction, link the refund transaction with the original (so you can quickly refer to it later), and also mark selected products as refunded. All this will work just auto-magically!
Be it full refunds or partial refunds, Putler is the way to go!
If you are using PayPal, Shopify, Braintree or Stripe, here is your chance to make processing refunds a less stressful experience. I recommend you to connect your data sources to Putler, provide your support team limited a.k.a support access to Putler and issue all your future refunds from within Putler.
Want to give it a try before signing up for a paid plan? Then take Putler’s 14 day free trial.