
Running an eCommerce store without a robust analytics strategy is like sailing blindfolded on treacherous seas.
Understanding your customers’ purchase patterns is the key to unlocking success.
Shopify analytics may seem tempting, but inherent issues lurk within that can hinder your growth.
Enter Google Analytics, the game-changer your Shopify store needs.
Our comprehensive guide empowers you to harness its full potential. From unraveling customer behavior to refining your marketing strategy, we’ve got you covered.
Say goodbye to guesswork and embrace data-driven decision-making. Get ready to embark on a transformative journey as we demystify the process of integrating Google Analytics with Shopify.
With our expert guidance, you’ll navigate the waves of eCommerce with confidence, steering your business towards greater heights. Anchors aweigh, let’s set sail on this epic Shopify Google Analytics adventure!
Why do you need to add Google Analytics to Shopify?
Before we move on to the “How” part, let us first find the answer to “Why”. Here’s why Google Analytics is an absolute requirement if you want to boost the performance of your Shopify store:
- Shopify eCommerce Analytics is dependent on the current Shopify plan you’re using. If you have a basic Shopify plan, your analytics reports will be limited compared to an advanced plan. On the contrary, Google Analytics lets you generate analytics reports at your convenience.
- Shopify analytics can offer you data for a maximum of 250000 customers. Naturally, many eCommerce stores have more customers. For those stores, Google Analytics is a better option.
- Google Analytics works for all platforms. So, if you plan to migrate your eCommerce store to any other platforms like BigCommerce, WooCommerce, Wix, etc. from Shopify, you can always add Google Analytics there. Hence, being familiar with Google Analytics can pay off in that case.
- Honestly, Google Analytics is much more popular compared to its alternatives. There are so many features getting added to this analytics tool every now and then. These features can help you get a better hold over your eCommerce store with close insights into customers’ behavioral patterns. Hence, you can enjoy better management of your goals with the data you’ll need.
Once you have Google Analytics set up, you can start focusing on optimizing your Shopify store based on the data you collect.
How do I connect Google Analytics to Shopify?
Setting up Google Analytics for your Shopify store is a breeze. Just follow these simple steps:
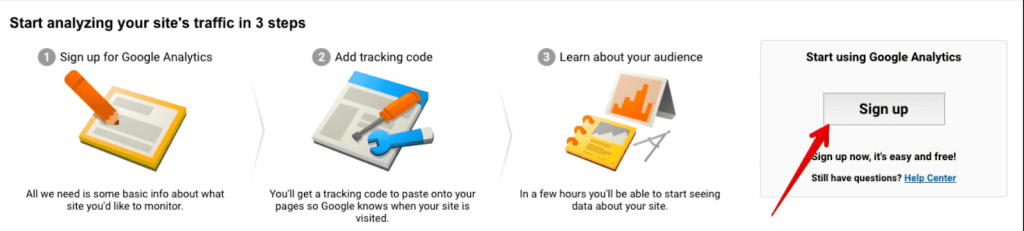
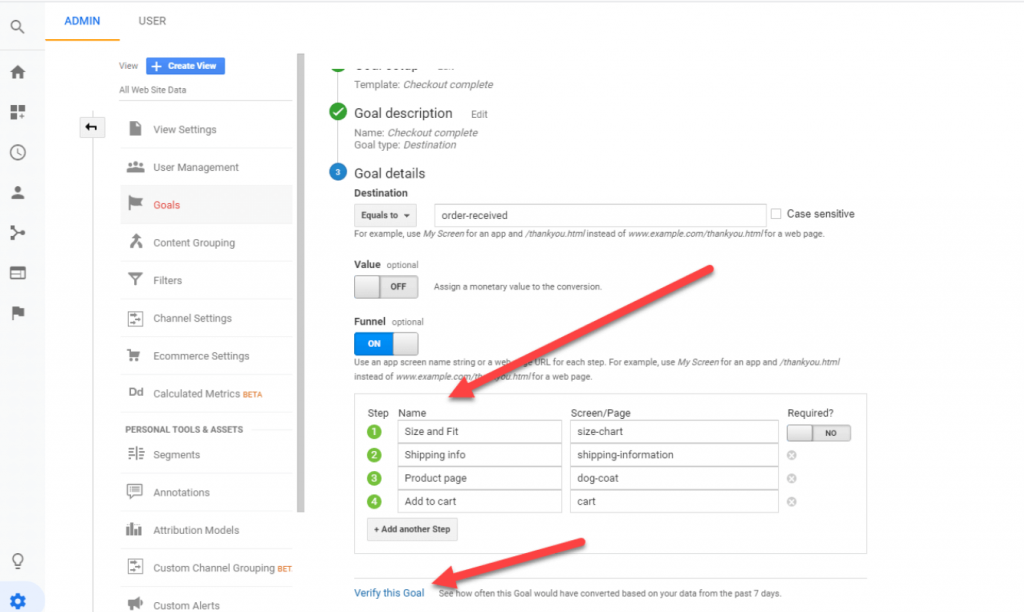
Step 1: Create a new Google Analytics account
Before we discuss how to add Google Analytics to Shopify in our Shopify Google Analytics Guide, let us learn how to create a new Google Analytics account first. If you have a Google Analytics account already, you can always skip this step.
But if not, here is how you can start.
Signing up:
- Go to Google Analytics and use your Google account credentials to sign in. You can see the below dialog box now:
- Now select the “sign up” option at the extreme right of the dialog box and choose the property you want to track.
- To get Shopify Google Analytics, you’ll need to provide the details of your website/eCommerce store and other factors like below:
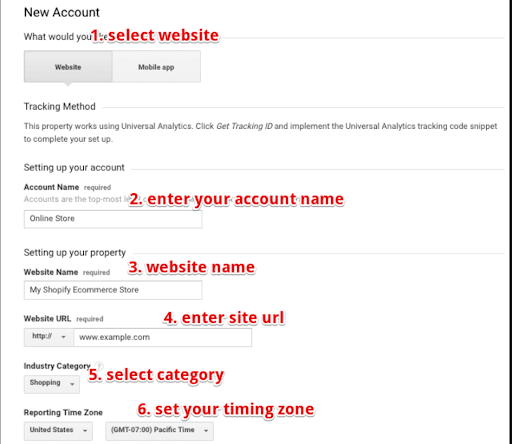
Set up your account:
- Give a name to your new Google Analytics account
- Fill in your website name
- Insert website’s URL
- Add a category
- Now select your time zone
Get your tracking ID:
Now you’ll have to click on the “Get Tracking ID” option.
- You’ll need to add some more details in a new dialog box to complete the set-up process.
- Once done, click “Next”. Your Google Analytics account is now ready.
Can you see the website tracking page now? Click on “Admin” and fill up the following details:
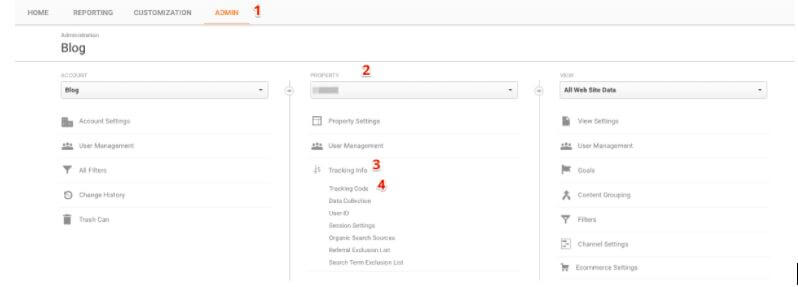
You need to add property details and tracking info to get your Google Analytics tracking code. Your screen should look like below:
Now, copy the code you see on the screen and save it.
Step 2: Set up your Google Analytics account
Now you need to log in to your Google Analytics account and go to the dashboard.
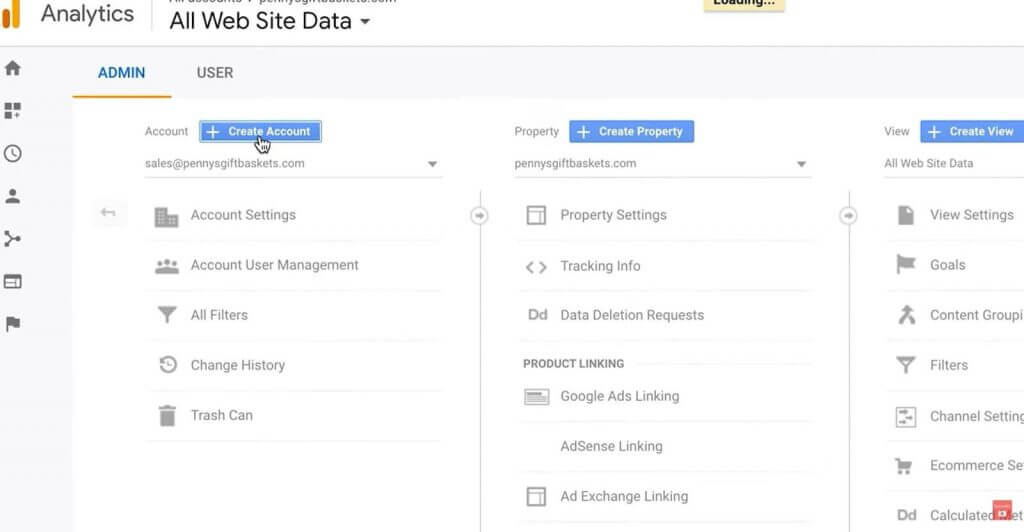
Access admin settings:
- Now click on the “Admin” option in the bottom left corner and see the following page:
- Click on “Create Account” now and select the tracking mode for your website. You’ll need to provide the following information hereby:
- Website name
- Website URL and the primary domain
- Select your website type
- Your current time zone
Obtain tracking ID:
- Now click on “Get Tracking ID”. You’ll now see the global tracking page opening up. You have to select the global site tag from there. Copy this Google Analytics tracking code from here.
Step 3: Adding the Google Analytics tracking code to Shopify
The next question users usually have is ‘How to connect Google Analytics to Shopify?’
Log in to your Shopify account:
- Here’s the answer- Log in to your Shopify account.
Navigate to the ‘Preference’ section:
- Select the “online store” option at the left and click on “Preferences”. Refer to the image below.
Paste the tracking code:
- Now as the Shopify Preferences section gets opened up, you need to select the Google Analytics option and paste the Google Analytics code in the box like below:
Now you can see a unique code appear on your computer screen like below:
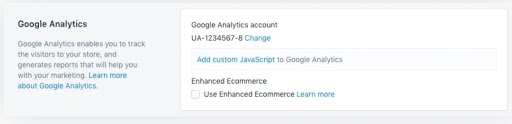
This is an indication that you have successfully added Google Analytics for Shopify store.
Setting up Google Analytics 4 on your Shopify store
Google has recently launched a new variant Google Analytics 4.
Here is a small video by Stewart Gauld that will help you setup Google Analytics 4 for your Shopify store.
Difference between Universal Analytics and Google Analytics 4
Universal Analytics and Google Analytics 4 are great tools from Google. They help you track and understand how visitors interact with your website or mobile application.
But do you know the difference between them? Or which one is better for your Shopify store? Let’s find out.
Universal Analytics
- Session-based tracking: Universal Analytics tracks data based on sessions (visits on your website). It focuses on key metrics like page views, bounce rates, and session durations.
- Desktop-centric: Universal Analytics is more suitable for desktop users.
- Cookies dependency: UA relies heavily on cookies for data.
Google Analytics 4
- Event-based tracking: Rather than session-based tracking, GA4 focuses on event-based tracking. This means that GA4 considers specific actions on your website to generate reports rather than mere visits. This approach is better as it helps you get a deeper understanding of your users.
- Cross-platform: GA4 tracks interactions across websites and mobile applications in one place.
- Privacy-focused: GA4 complies with strict privacy laws and doesn’t rely on cookies.
- Smart insights: Google Analytics 4 integrates with machine learning to offer smart insights and predictive analytics.
So which one is better for Shopify store owners? Well, it’s Google Analytics 4.
How can Google Analytics help you with eCommerce reports?
Here are the 3 major eCommerce analytics reports that you can generate with Google Analytics:
1. Enhanced eCommerce Report
This type of report can help you with the following information:
- A detailed overview of the product performance to get insights on conversion rates, the average number of transactions, the average value of orders, number of refunds, and more.
- A detailed shopping analysis report to identify numbers of cart abandonment cases, products that were added/removed from customers’ carts, etc.
- The effectiveness of your store’s sales path, ensuring seamless navigation for visitors
- The critical bottlenecks that can increase the bounce rate and hinder conversions
- The points where visitors exhibit interest by looping back for more information
- Get a visual picture of the various paths a user follows to enter your website
- The major sources (like social media, Google and other search engines, blogs, etc.) of traffic and individual volumes of visitors for each of these sources.
- The extent of visitor volume your store is getting from your email marketing campaigns
The product list performance reports that help you identify which pages of your eCommerce store are helping you drive maximum conversion rates
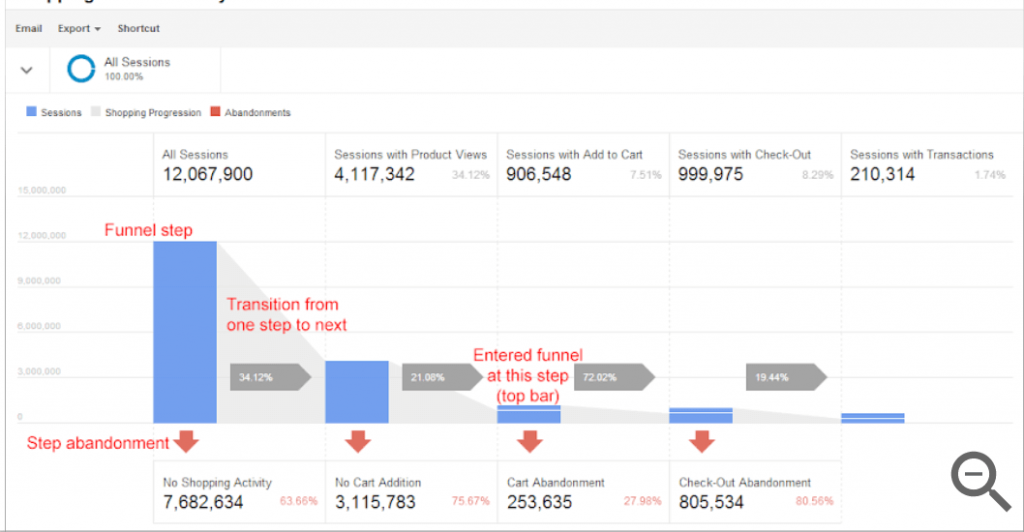
2. Goal Flow Report
This type of Google Analytics report helps you identify the following:
3. User Flow Report
With a user flow Google Analytics report, you can figure out the following:
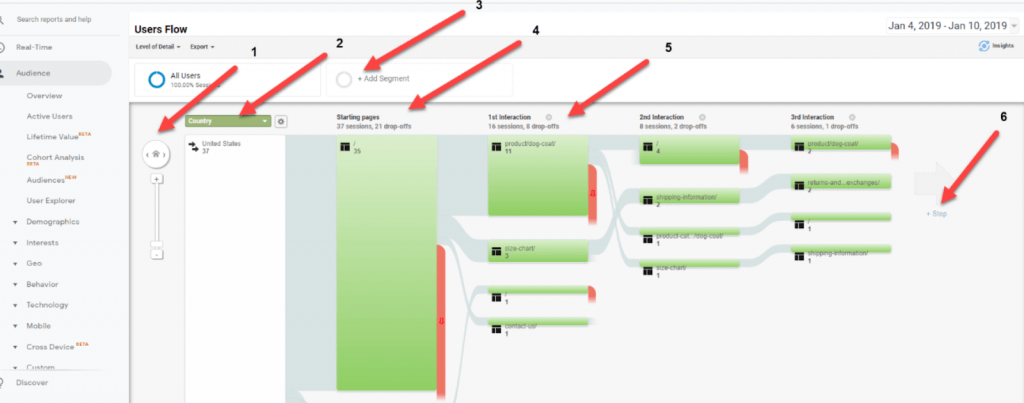
These reports give you the insights needed to boost sales on your Shopify store by understanding exactly where customers drop off and what drives conversions.
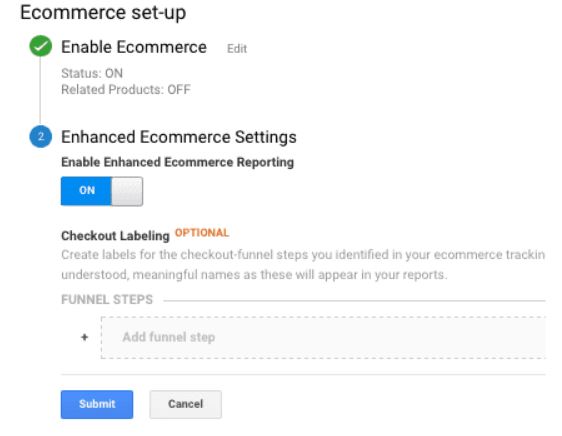
How to set up eCommerce tracking in Google Analytics for Shopify?
Setting up enhanced eCommerce tracking on Shopify is a straightforward process, all you need is to follow these simple steps:
- Log in to your Shopify account: Start by logging into your Shopify. Once you are logged in, click on “Online Store” followed by “Preferences”. Under the Google Analytics section, you’ll find the Enhanced eCommerce option. Hit the save button.
- Access Google Analytics: Now go to the home dashboard of your Google Analytics account. Click on the “Admin” and “View” options consecutively and finally select the eCommerce Settings option.
- Enable Enhanced eCommerce section: Now turn on the “Enhanced eCommerce Settings” option and you’re good to go.
Troubleshooting common issues with Shopify Google Analytics integration
Integrating Google Analytics with Shopify is important but sometimes you can face several issues. Let’s fix them one by one:
- Tracking code doesn’t work:
If your analytics data isn’t showing up, here are some steps you can follow:- Go to your Shopify admin.
- Then navigate to Online Store > Preferences and check if the Google Analytics field contains the correct tracking ID.
- Duplicate tracking:
Many times, tracking the same data multiple times can lead to inaccurate metrics. So if you have added tracking code in the theme section as well as in the Preferences section, then this issue may occur. To fix this, you have to remove additional tracking codes. - Enhanced eCommerce data missing:
If you cannot see enhanced eCommerce data like product impressions or sales, you should check the whole process for issues. Go to Online Store > Preferences and in Google Analytics, Admin > eCommerce Settings. - Cross-domain tracking issue:
If you are using multiple domains such as separate checkout domains, you might see some gaps in the tracking data. To resolve this, you can implement cross-domain tracking by setting up referral exclusions in Google Analytics. - Referral exclusions not set up:
If your domain is listed as a referral source, you might notice inaccurate data. To resolve this: Go to Admin > Property Settings > Tracking Info > Referral Exclusion List in Google Analytics. Here add your Shopify domain to the list. - Slow data updates:
If you cannot see Google Analytics reports in real-time, you can check if the data sampling settings in GA4 are correct. Here ensure that you are using the standard reporting view.
What are the different types of Shopify reports?
Here’s what you should expect from Shopify reports based on the plans you choose:
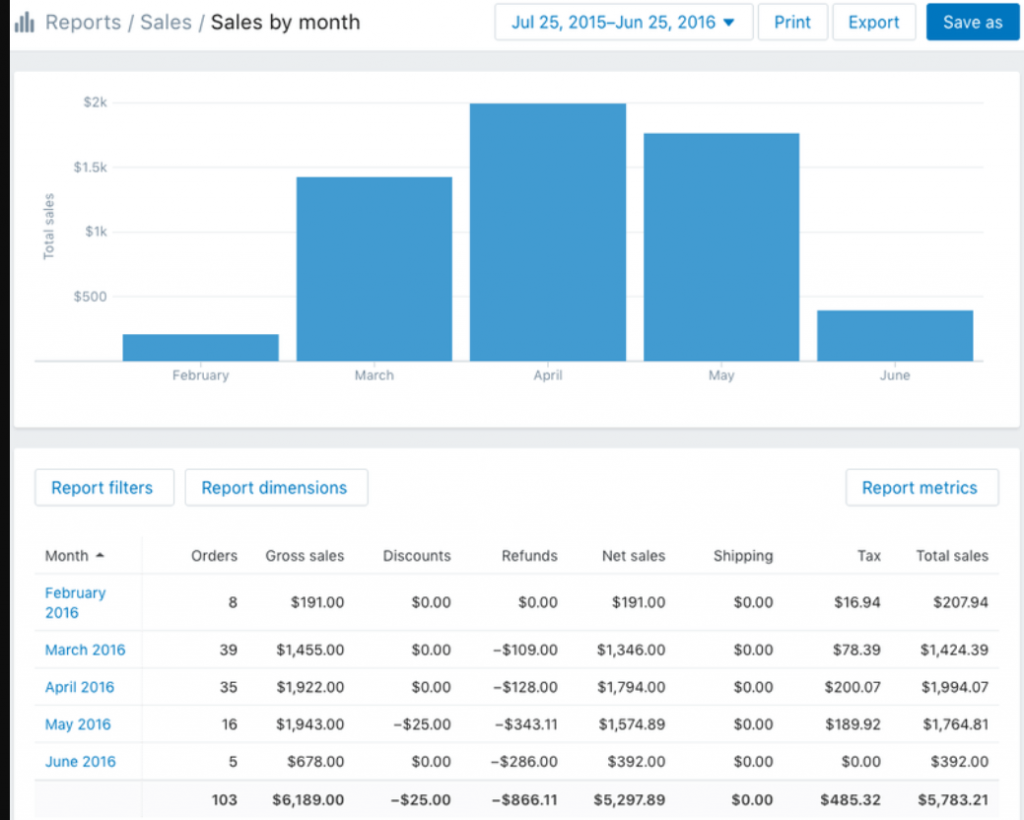
Sales reports
This Shopify eCommerce analytics report can help you with all information associated with customers’ orders, sales over time, sales of different products or by channels, and so on. However, you cannot generate this report in the Shopify Lite and Basic Shopify plans. It is only accessible to the Shopify, Advanced Shopify, and Shopify Plus plans.
Customers reports
This Shopify analytics report can help you get an overview of the numbers of customers over time, customer segmentation based on location, one-time customers, long-term customers, and so on. Hence distinguishing between loyal customers and customers at risk becomes simpler. Again, this report is limited to the Shopify, Advanced Shopify, and Shopify Plus Plan holders.
Shopify custom reports
Shopify also allows you to create customized reports that are specific to your eCommerce store. These reports can help you make informed decisions by showing the required modifications that you need to make to your store’s design. However, this report is limited to the Advanced Shopify and Shopify Plus holders.
An overview of Shopify pricing plans
| Price and Features | Shopify Lite | Basic Shopify | Shopify | Advanced Shopify | Shopify Plus |
|---|---|---|---|---|---|
| Price | $9/month | $29/month | $79/month | $299/month | $2000/month |
| Sales Reports | NA | NA | Available | Available | Available |
| Customers Reports | NA | NA | Available | Available | Available |
| Custom Reports | NA | NA | NA | Available | Available |
Why do you need other tools for eCommerce tracking?
While Google Analytics is a great tool for tracking website traffic and basic eCommerce metrics, you might need additional tools for more advanced eCommerce insights.
For example, tools like Putler can help you get real-time insights into your store and help you capitalize on opportunities and resolve emergencies.
Additionally, while Google Analytics provides a brief overview of your store’s performance, tools like Putler go deeper than that. They track advanced metrics and offer detailed sales reports across multiple channels.
Overall, Google Analytics is a great starting point but integrating it with other tools offers more specialized eCommerce tracking. This, in return, provides a better picture of your store’s performance and helps you make informed decisions.
Best Shopify Google Analytics apps
When it comes to supercharging your Shopify store with Google Analytics, these three apps are absolute game-changers:
Putler
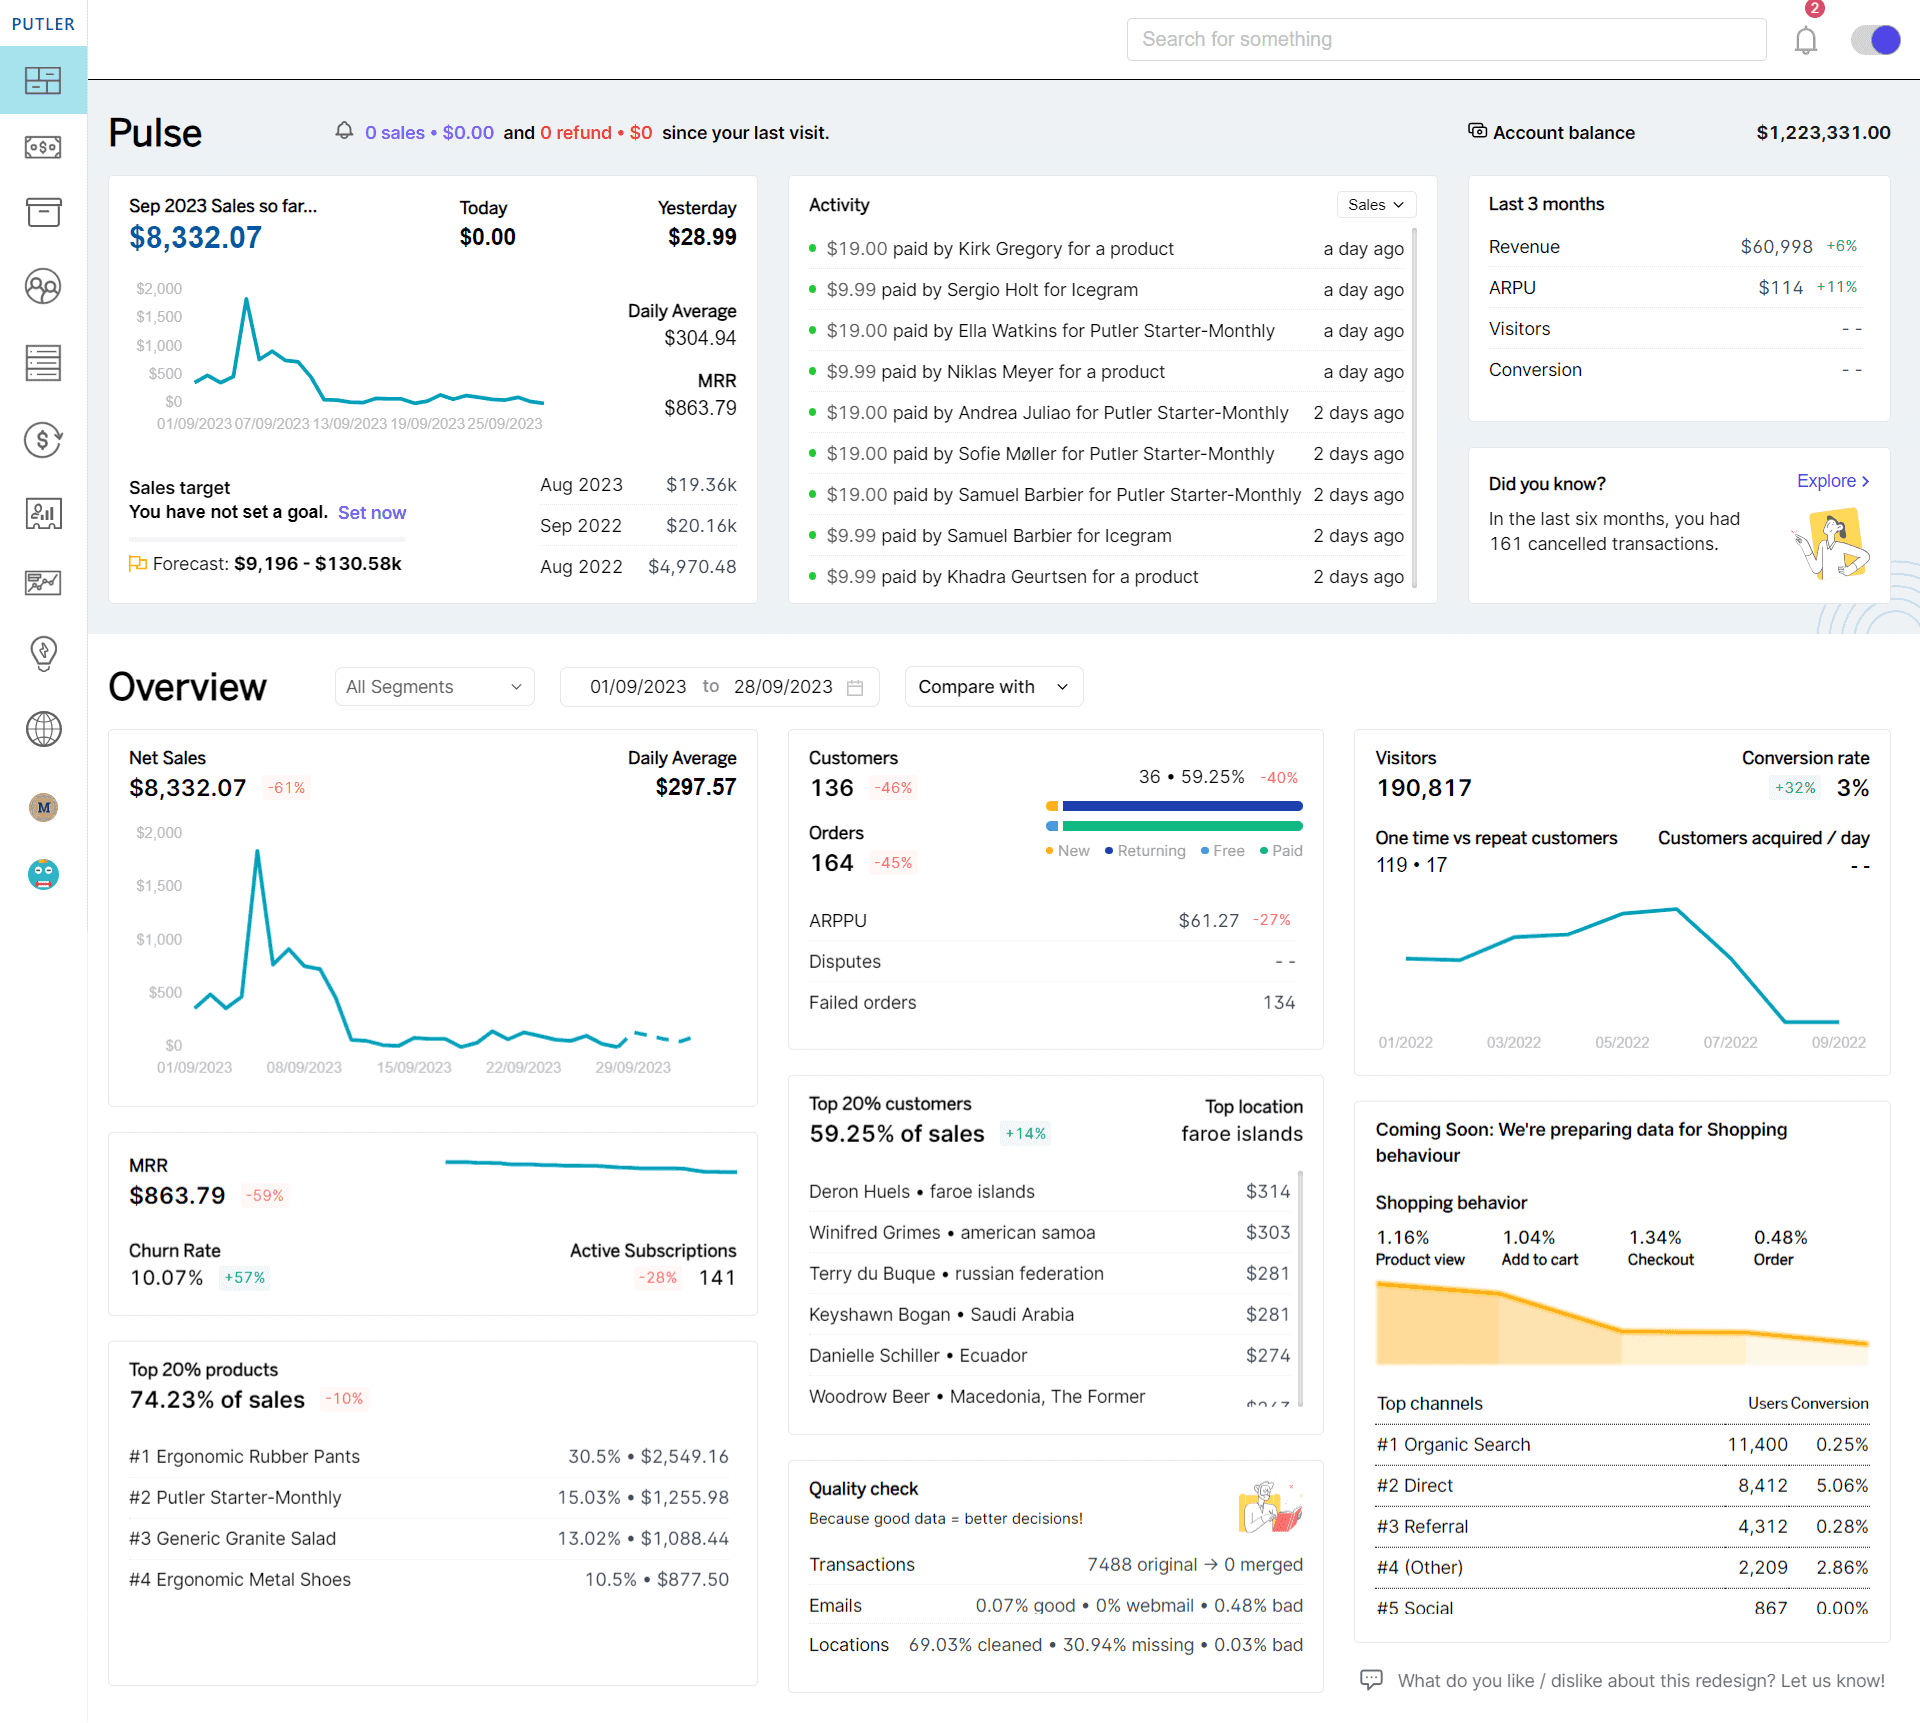
Putler is a comprehensive eCommerce analytics tool that seamlessly integrates with Shopify and Google Analytics. It can help you understand your overall business performance, also identify growth opportunities, and optimize your strategies for better outcome.
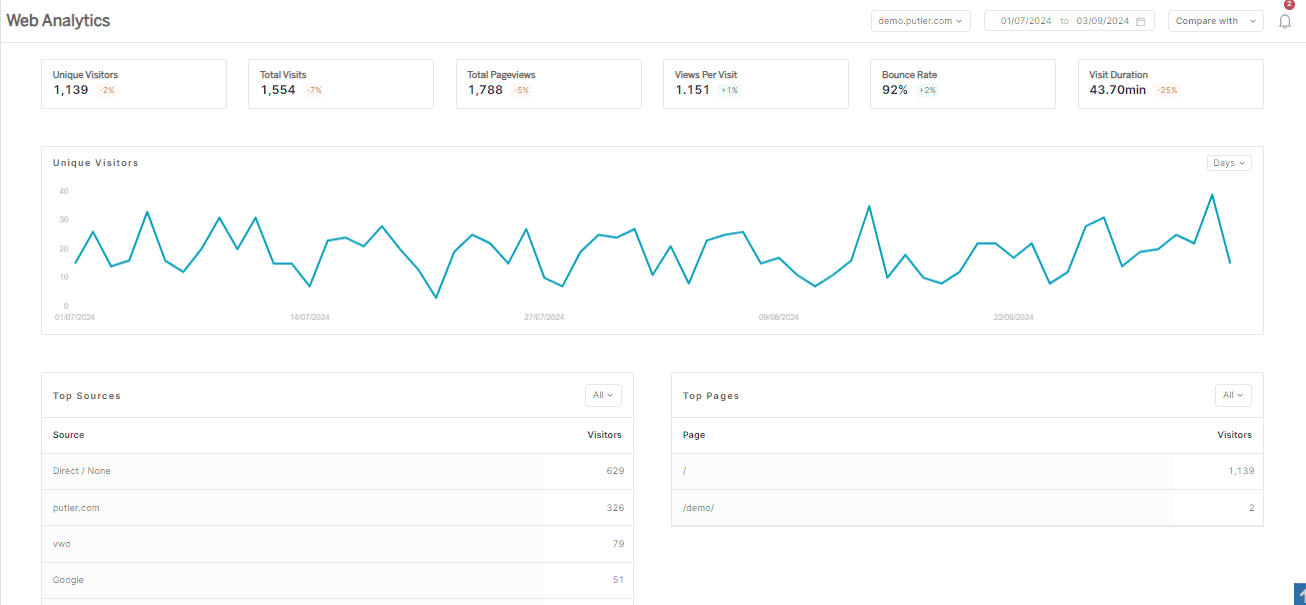
Speaking of web analytics, Putler has two dashboard dedicated to the same. These are –
Audience dashboard: This dashboard shows data fetched from GA, but in a much simpler and easier-to-understand way. This data only shows up if you have GA integrated to Putler.
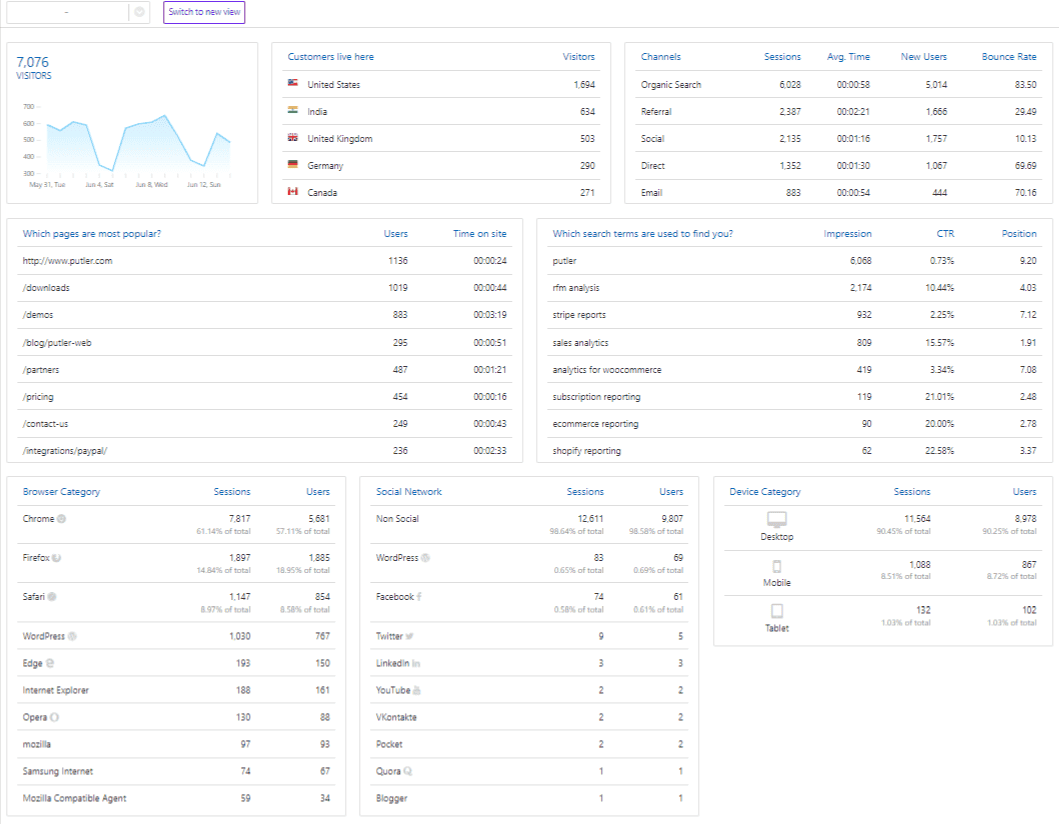
Web Analytics dashboard: This one shows Putler’s privacy-friendly web analytics which is independent of GA. This also helps you dig deeper into your web analytics, understand your campaign performance, audience insights, and a lot more.
Features
- In-depth reporting and analysis
- Real-time sales tracking
- Customer behavior insights
- Powerful segmentation capabilities
- Customizable reports
- Trend identification and analysis for data-driven decisions
- 17+ data source integrations
Pricing
Putler offers three different pricing plans based on your monthly revenue:
- Starter: $20/month
- Growth: $50/month
- Custom: Contact sales
Littledata
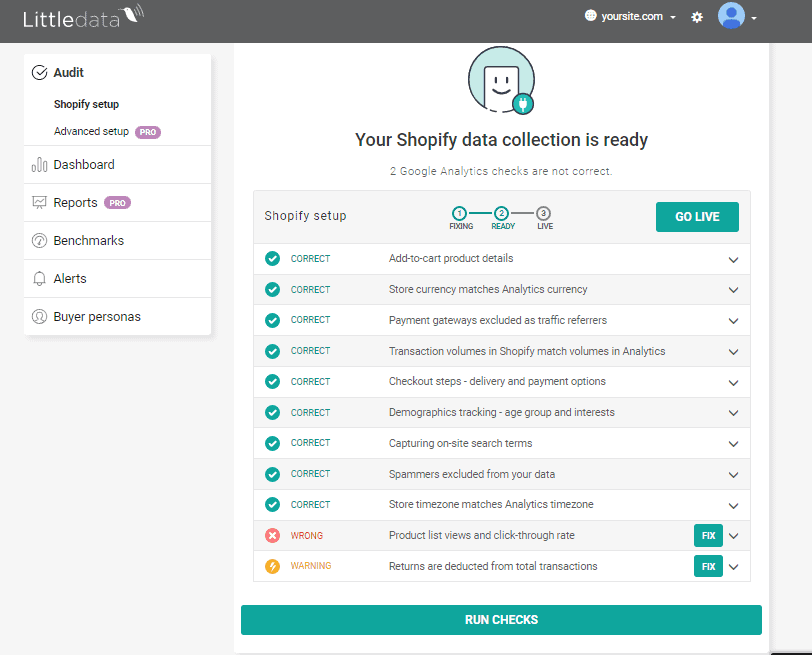
Littledata is another Shopify app that seamlessly connects your store to Google Analytics. It helps you track your store’s performance, ensuring accurate data collection and analysis.
Features
- Automated reporting and smart insights
- Enhanced eCommerce tracking
- Custom dimensions
- Segment-level data analysis
- Smart insights for better performance tracking
Pricing
Littledata offers three different plans based on your Shopify orders:
- One destination: $99/month (limit: 1500 orders) and higher
- All destinations: $169/month (limit: 1500 orders) and higher
- Littledata Plus: Custom
Shopify Analytics
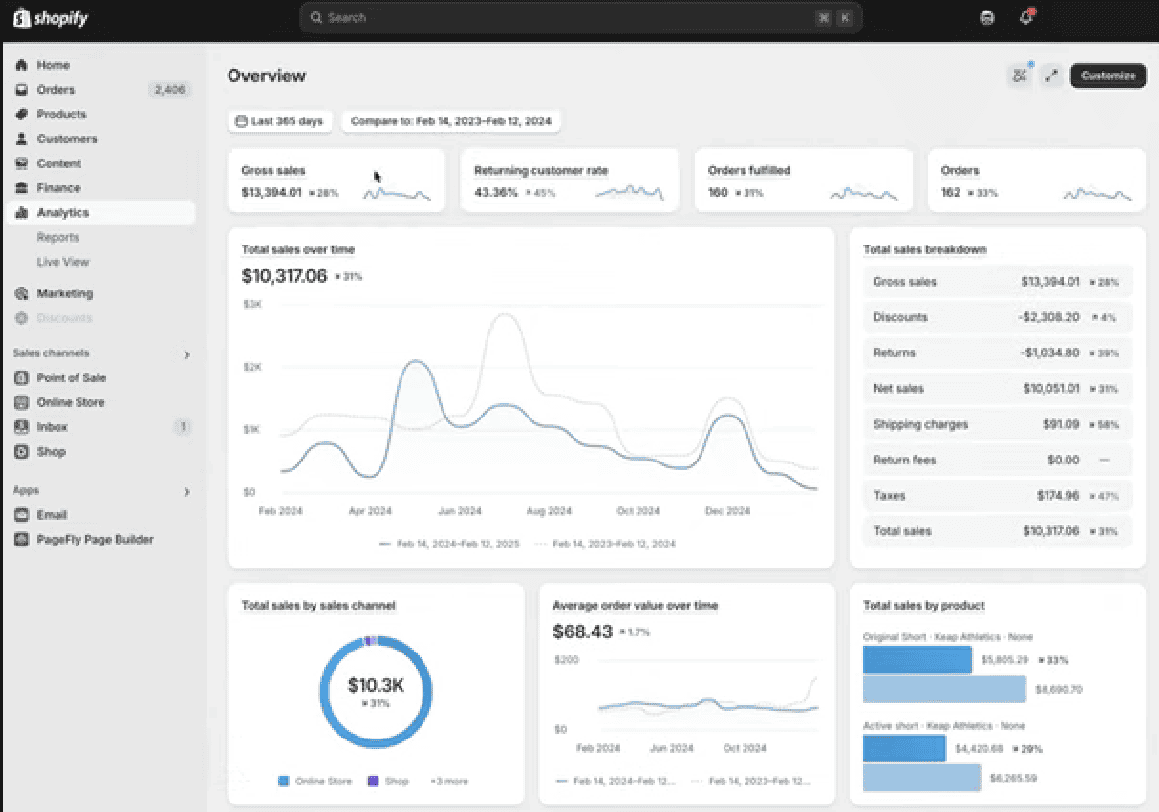
Shopify Analytics is an in-built analytics tool of the Shopify platform. It provides comprehensive data tracking, analysis, and Shopify reporting for your business.
Features
- Real-time dashboard for live store activity
- Easy-to-navigate user interface
- Customizable Shopify reporting and analytics
- Easy integration with Google Analytics
- Detailed insights on sales, marketing, and customer behavior
- Multi-channel analytics for sales
Pricing
Shopify Analytics is included with the platform cost.
These Shopify Google Analytics apps provide valuable insights and analytics to help you optimize your store, understand your customers better, and drive higher conversion rates.
Choose the one that suits your needs and take advantage of the power of data-driven decision-making for your Shopify store’s success.
Why Putler is the best solution for Shopify Google Analytics reports?
While several apps are available to integrate Google Analytics with your Shopify store, Putler stands out as a comprehensive analytics and insights tool.
Besides the Audience dashboard and the Web Analytics dashboard, there is a lot more to Putler that can contribute to the success of your Shopify Google Analytics integration.
Here’s why Putler is the ideal choice for enhancing your Shopify Google Analytics reports:
- Multi-store reporting: Analyze multiple Shopify stores conveniently from a single location. View combined reports for all your stores or create separate views to examine each store individually.
- Advanced reports: Gain access to advanced reports on Products, Customers, Sales, Orders, and Website Traffic without needing a premium Shopify plan. Grow your store with Putler’s comprehensive insights.
- Budget-friendly: Enjoy cost-effective pricing with Putler’s advanced reports starting at just $20/month, compared to Shopify’s higher-priced plans, which can cost around $299/month.
- Insights and marketing features: Putler goes beyond reports by providing valuable insights and marketing tools to help your store thrive. Benefit from customer segmentation, targeted email campaigns, filtering options, custom segments, forecasting, goal tracking, comparison reports, and more.
- Multi-currency support: Putler seamlessly handles transactions in multiple currencies. With stored historic exchange rates, you can effortlessly view accurate reports in your preferred base currency.
By choosing Putler as your analytics solution, you can unlock the full potential of Shopify Google Analytics reports, optimize your store’s performance, and drive growth for your business.
Over to you
As you embark on your Shopify journey, remember that Shopify and Google Analytics are just the beginning.
You need a game-changing solution to unlock comprehensive reporting and overcome data discrepancies. Enter Putler.
With Putler, you gain access to advanced reports, multi-store reporting, in-depth insights, and whatnot without the expense of the Premium Shopify plans.
Say goodbye to data discrepancies and hello to actionable insights that drive success. Optimize conversions, make informed decisions, and propel your revenue with Putler’s affordable and comprehensive analytics.
Embrace Putler and pave the way for remarkable growth in your Shopify store.
Your success story awaits.
FAQS
What metrics should you track in Shopify vs GA?
In Shopify, track metrics like sales, orders, and customer behavior. With Google Analytics, focus on website traffic, user engagement, and conversions. Combine both platforms for a comprehensive view of sales, conversion rates, average order value, customer acquisition, demographics, and user behavior.
Does Shopify work with Google Analytics 4?
Yes, combining Shopify and Google Analytics 4 is a great option to track your website performance. You can integrate your store with GA4 for advanced analytics and tracking capabilities. You can utilize GA4 to track metrics such as website traffic, user behavior, and conversions. Additionally, exploring other analytics solutions like Putler can provide you with additional insights and Shopify reporting options to enhance your understanding of your store’s performance.
Can I use Putler to track multiple Google Analytics accounts?
If you have multiple Google Analytics accounts set up for your different Shopify stores, you will love Putler. It integrates data from all over the place and presents you with a unified picture.
This cuts down the time spent switching tabs and finding everything in one place.
What are some advanced Google Analytics features that can provide deeper insights for Shopify store owners?
Apart from basic features, you can explore features like custom dimensions, user ID tracking, and cohort analysis to get deeper insights into your visitors and make strategic decisions.
- What You Need to Know About Shopify Customer Segments?
- Multiple Shopify Stores: Step-by-Step Guide for Managing Multiple Shopify Shops from One Place
- Amazon vs Shopify — Which is Better for eCommerce Business?
- How to Export Shopify Data Manually & Automatically in 2026?
- The Best Shopify Marketing Strategy to Skyrocket Your eCommerce Sales